Dried bayberry
Overview
The most versatile bayberry - dried bayberry! Today I will continue to toss my bayberry~ By the way, the bayberry is about to fall. I still have some bayberry at home, and there is no room to store it in the refrigerator freezer. So I might as well make some dried bayberry, which is delicious and easy to store ~ So I immediately checked the recipe online and learned how to make it~ After I finished it, the picky foodie in my family was full of praise! I don’t know what’s in those dried bayberries in the supermarket, they’re so weak~
Tags
Ingredients
Steps
-
Prepare fresh bayberries and rinse them with water several times.

-
Put it in a pot, pour water into the pot (the water is almost equal to the bayberry), and put some salt (salt is to kill insects and remove acid).

-
After boiling, pour out the salt water from the pot.

-
Then add an appropriate amount of water to the pot, and add white sugar or rock sugar. The sugar can be added as appropriate (you don’t need a lot of water, and you don’t need to cover the bayberries. If you add too much, you can scoop out some when the juice is thickened halfway through cooking. You can drink the sweet and sour bayberry juice directly, or make other things, such as jelly, popsicles, etc.).

-
After it boils, turn to medium heat and continue to cook, skimming off the top layer of foam (just turn it over occasionally during this period, no need to stir frequently).

-
The water in the pot is almost dry, turn to low heat and continue cooking. At this time, stir frequently, up and down like stir-fry, to avoid burning the pot (as long as you don't stir and shovel, feel free to stir, don't worry that the bayberries will fall apart).

-
The water in the pot is getting less and less. Continue to cook on low heat. Remember to stir constantly. The bayberries are gradually getting smaller and darker in color. If you like it dry, you can cook it for a while, as long as it does not burn the pot (the whole cooking process is very long, so be patient)

-
I didn't cook it very dry, so I put it in the oven and baked it for a while. The middle or upper middle layer of the oven was baked at 120 degrees for more than an hour (you can also dry it in the sun and let it dry naturally).

-
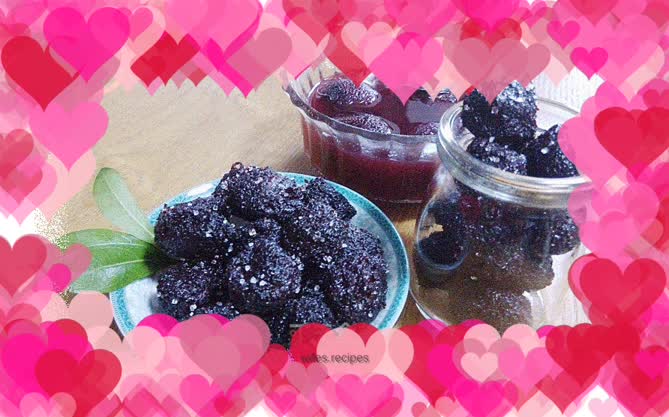
Cool the prepared dried bayberry a little, sprinkle with some sugar, and the dried bayberry is done~

-
Paired with the canned bayberry made by myself, it is so delicious that I can’t stop talking, haha! ~If you can't finish it, you can put it in the refrigerator and keep it sealed and refrigerated. If it's dry in the sun, just keep it sealed without putting it in the refrigerator (but again, if you make it yourself without any additives or preservatives, you still have to finish it as soon as possible).
