Cantonese style mooncake with red bean and egg yolk filling
Overview
The moon is full during the Mid-Autumn Festival, feel free to DIY! This is the second year I have made my own mooncakes, but I have been seriously procrastinating until now on writing the recipe! I like to stir-fry the stuffing myself, it won’t be as sweet as the stuffing bought from outside! This year there are only fried red bean fillings/lotus paste fillings/purple sweet potato fillings.
Tags
Ingredients
Steps
-
Weigh the ingredients for the mooncake skin: low-gluten flour/high-gluten flour/syrup/corn oil/water.

-
Add syrup and corn oil to the syrup.

-
Mix well with a hand mixer.

-
Sift in high and low gluten flour.

-
Use a silicone spatula to stir to combine.

-
Place in a plastic bag and refrigerate for more than an hour. I made the crust dough for several months at a time, making each one according to the quantities above.

-
Homemade red bean paste.

-
Soak the salted egg yolks in peanut oil or brush with white wine overnight in advance to remove the smell. Put the salted egg yolks into the preheated 150-degree middle rack and bake for 8 minutes. Remember not to overcook it and make it oily!

-
When the egg yolks are cool, roll the salted egg yolks in red bean filling 42G/each (I used a 63G mold this time: skin 21G filling 42G), roll into a round shape and cover with plastic wrap and set aside.

-
Take out the pie crust from the refrigerator and weigh it at 21G/piece.

-
Take a piece of pie crust. (You can dip your hands into some cooked rice flour. I fried the glutinous rice flour myself)

-
Flatten and fill with red bean and egg yolk filling.

-
I'm used to pushing with my hands the other way around.

-
Turn and push upward when closing the tiger's mouth.

-
Wrap them up one by one.

-
Fabric crystal molds are beautiful.

-
Take a mold

-
Fill it with cooked flour and dip it in

-
Put the wrapped mooncake balls into the mold.

-
Press the dough with your left hand, place the mooncake mold into the baking pan, and press out the pattern. Do not press too hard when pressing the pattern. After pressing the pattern, gently lift the mold and release your hand. The mooncake is ready

-
One plate was printed, and I loved the French bakery crystal mooncake mold I got this time every time I printed it.

-
Preheat the oven to 200 degrees. After the oven is preheated, put it in the middle rack and bake it for 7 minutes. Remember to spray water before putting it in the oven to prevent cracking.

-
The mooncakes are set in the oven for the first time.

-
Let the mooncakes cool for a while, preheat the oven to 180 degrees, bake in the oven for 7 minutes, brush with egg wash, and only brush the protruding patterns and sides. Use a bristle brush to brush the mooncakes. After it is dipped in the egg liquid, scrape off the excess egg liquid on the side of the bowl and then brush it onto the mooncakes. If the brush is stained with too much egg liquid, the texture on the surface of the baked mooncake will be unclear.

-
Bake at 180 degrees for 7 minutes, three times in total. Each time, wait for the mooncakes to cool down slightly, then brush with egg wash and put them in the oven.

-
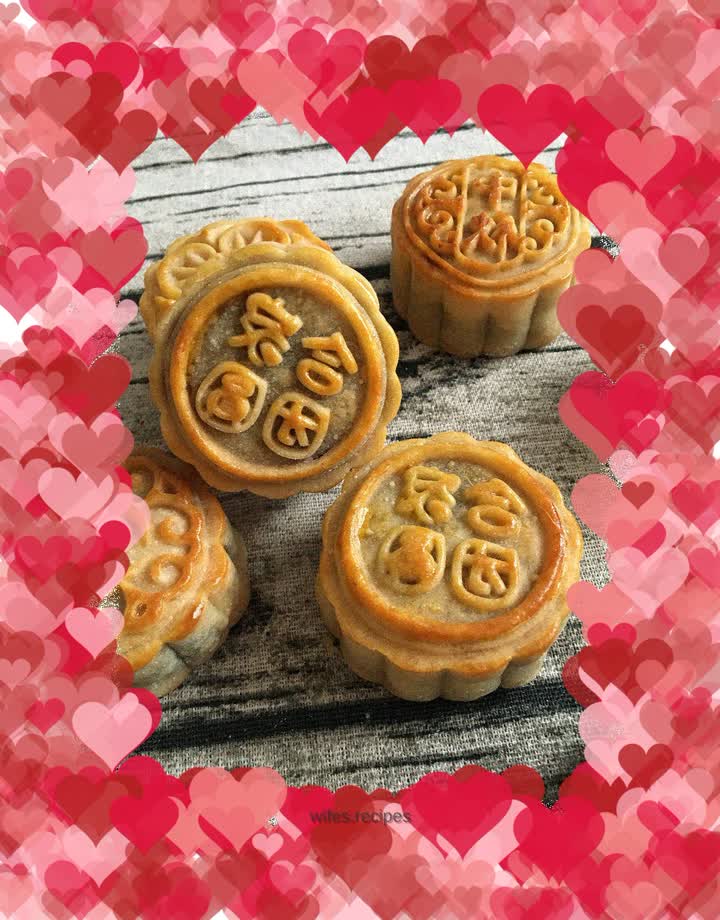
Baked mooncakes.

-
The baked mooncakes are immediately taken out of the oven, wait for the temperature to cool down slightly, and then placed on the grill to cool. Then put the mooncakes into a crisper or packaging bag and put the mooncakes into a tray. Put a deoxidizer at the bottom of the tray and use a sealing machine to seal the bag. Wait two days for the oil to return and then you can eat it. This recipe can be eaten in almost a day.

-
The mold is beautiful and the finished product is also beautiful.

-
It can be packaged like this and is suitable for giving away.

-
Happy Mid-Autumn Festival.

-
I cut it into pieces I made the day before and saw that the oil recovery was not good yet, but it was already delicious.
