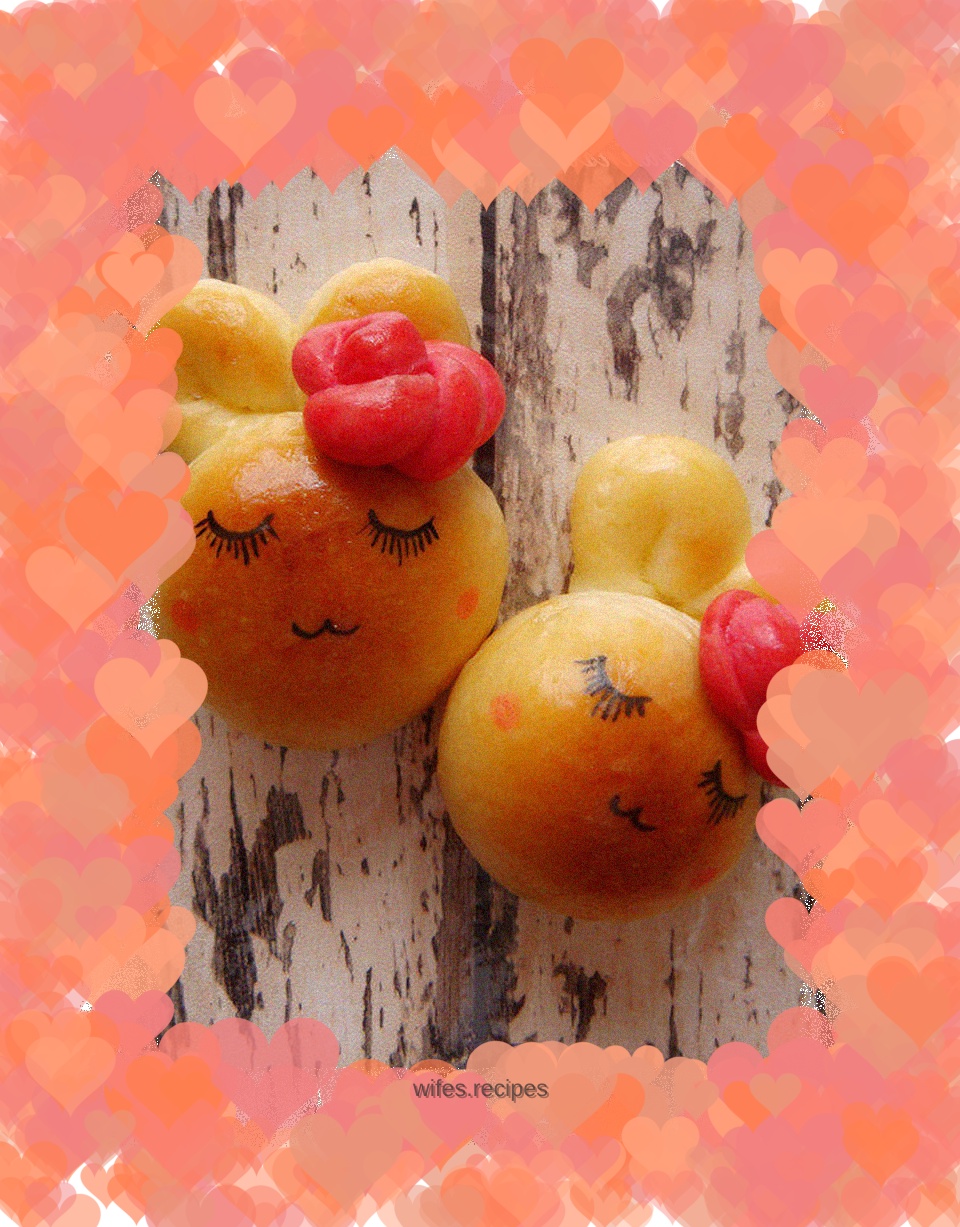
Cute rabbit bread
Overview
A cute little bunny bread, you will be fascinated by it at one glance~ Don’t you want to take one home?
Tags
Ingredients
Steps
-
Prepare ingredients: high-gluten flour: 210g, milk: 98g, caster sugar: 30g, unsalted butter: 30g, egg liquid (for kneading): 35g, yeast: 3g, salt: 2g, egg liquid (for brushing): appropriate amount

-
Put the ingredients except butter into the bread bucket, liquid ingredients first.

-
Pour in the flour again. Diagonally add yeast and salt to the flour. The purpose of this is to prevent direct contact between salt and yeast and destroy yeast activity. After all the ingredients are put in, start a dough kneading program. My bread machine has a dough setting setting of 20 minutes.

-
After 20 minutes, pour in the melted butter at room temperature and continue to start a dough mixing process.

-
After the program is finished, take out the dough. Cover the dough with a clean, damp cloth and let it rest for a few minutes. Take it out again and you will find that the glove film is not a dream~

-
Roll the dough into a round shape and place it in a container for fermentation.

-
Place a basin of hot water on the lower rack of the oven and place the dough on the middle rack of baking grid. The purpose of this is to keep it moist and promote fermentation.

-
It took me 50 minutes to ferment this noodle. Fermentation time is not static and will vary with seasonal temperatures. But you can grasp the key points by observing the state of the dough. When the dough has risen to 2-2.5 times its original size. We dip our fingers in a little flour and poke the dough. When the dough does not shrink or collapse, it means it has risen just right. If it shrinks, it proves that it has not been sent enough, and if it collapses, it proves that it has been sent too much.

-
After the fermented dough is deflated, divide it into nine equal parts.

-
Eight of them are for rabbits and one for head flowers. Take one of the pieces and cut off about a fifth of it to make the bunny's ears, and the rest to make the bunny's face.

-
Roll the dough into separate balls.

-
Make the shapes of two ears.

-
Assemble the ears and face.

-
Prepare all the bread dough and let it ferment for the second time at room temperature. Cover the surface with plastic wrap to prevent it from drying.

-
While waiting for the second batch, we dyed the remaining portion of the original dough with food coloring.

-
Divide the pink dough into four equal portions to make eight flower heads. Take one part and divide it into five parts.

-
Press the dough into a round shape, leaving space between the dough and overlapping them. Use chopsticks to press in the center with a little force to ensure that the dough pieces stick together.

-
Roll up from one end, so that the prototype of the flower is ready.

-
Use a knife to cut through the indentation in the center, and two beautiful hairs are ready.

-
The flowers are also fermented a second time.

-
When the bread dough has risen to 1.5-2 times its original size, preheat the oven to 170 degrees. Brush egg wash on the surface of the blank.

-
Bake in the middle rack of the oven at 170 degrees for 18 minutes.

-
Then brush the surface of the secondary fermented flowers with egg wash and put them in the oven for baking. The middle level is 170 degrees for 10 minutes. Please increase or decrease the specific time according to the size of the flowers and wait until you smell the aroma of bread. The reason why the flowers are baked separately instead of assembled on the bunny is to prevent the flowers from becoming colorful if the time is too long. If you find it troublesome, you don’t have to make the head flower. This recipe can make 9 little bunnies.

-
.Use food coloring pens to draw the bunny’s facial features. If you don’t have coloring pens, you can also use melted chocolate.

-
Apply honey to the back of the roasted flowers.

-
Put a tiara on the bunny. The head flower can be fixed on the bunny by using honey glue, but it will fall off after a long time. If you're looking for perfection, you can use toothpicks to secure it, but be sure to remove the toothpicks before eating.

-
The little white rabbit jumped to the bakery and asked: "Boss, do you have a hundred buns?" The boss: "Ah, I'm so sorry, there are not that many." "That's it..." The little white rabbit left dejectedly.

-
The next day, the little white rabbit jumped to the bakery and asked, "Boss, do you have a hundred buns?" The boss said, "I'm sorry, but there are still none." "That's it..." The little white rabbit left dejectedly.

-
On the third day, the little white rabbit jumped to the bakery, "Boss, do you have a hundred buns?" The boss said happily: "Yes, yes, today we have a hundred buns!!" The little white rabbit took out the money: "Great, I will buy two!" Dear friends, let's not chat for now, Liuliu went to make 100 buns, and the little rabbit will come and ask tomorrow!
