Love and happiness---cute bear cake
Overview
The original intention of baking was to provide safe and hygienic food for my children and family. As I was doing it, I fell in love with baking, the wonderful transformation process of the ingredients, and the satisfaction of eating it for my family. The initial flour ingredients were purchased from the supermarket. Later, a baking friend recommended Xinliang's products, so I made a comparison and realized the charm of professional products. I have been using this brand since then, the price is reasonable, and the cakes and breads made are soft and delicious. Thanks to my baking friends for your recommendation and Xinliang’s products! Yesterday I made a cute Cocoa Bear cake that my children love to eat to express my full love!
Tags
Ingredients
Steps
-
Prepare the ingredients (I weighed the oil and milk and put them in a container)

-
Separating egg whites and yolks (the egg white container must be clean, dry, oil-free and water-free, and there must be no egg yolk)

-
Add 10 grams of caster sugar and stir the oil and milk until emulsified

-
Sift in the Xinliang cake flour and cocoa powder, add two drops of vanilla extract and mix until there is no dry powder (do not over mix), then add the egg yolks in the same manner as above.

-
Once the copy is ready, set it aside

-
Add 1 gram of salt and 3 or 4 drops of lemon juice to the egg whites. Beat until the fish eyes are foamy. Add 40 grams of fine sugar in 3 batches and beat until stiff peaks

-
Preheat the oven to 135 degrees and 145 degrees for ten minutes. Pour one-third of the egg whites into the egg yolk batter, mix evenly with a single stroke and stir (not in circles), then pour into the remaining egg whites, mix evenly with a single stroke and stir (not in circles), then pour into a six-inch round live-bottom anode cake mold. Hold the mold horizontally with both hands about 30 cm away from the table and let it fall vertically. Then put it in the oven at 135 degrees and bake at 145 degrees for 45 minutes. (The temperature of each oven will have some deviations. Set the optimal temperature according to your own oven).

-
This is what it looks like after baking for twenty minutes

-
After baking, take it out and drop it vertically to knock out the air, then turn it upside down immediately. When it is completely cool, remove it from the mold. I baked it at night and removed it the next morning.

-
After unmoulding, divide the cake evenly into three pieces

-
Add 300 grams of whipping cream and 30 grams of fine sugar and beat until there are lines. Add 5 grams of cocoa powder and continue beating until you can lift the egg beater and small peaks appear. Apply a layer of cream to one piece of cake and then spread it around again. There is no need to spread it very evenly.

-
Beat a piece of cocoa chiffon cake into a fine powder with a blender or food processor (I made a moss cake the day before to give away an extra piece, or you can bake an extra paper cup or small cake)

-
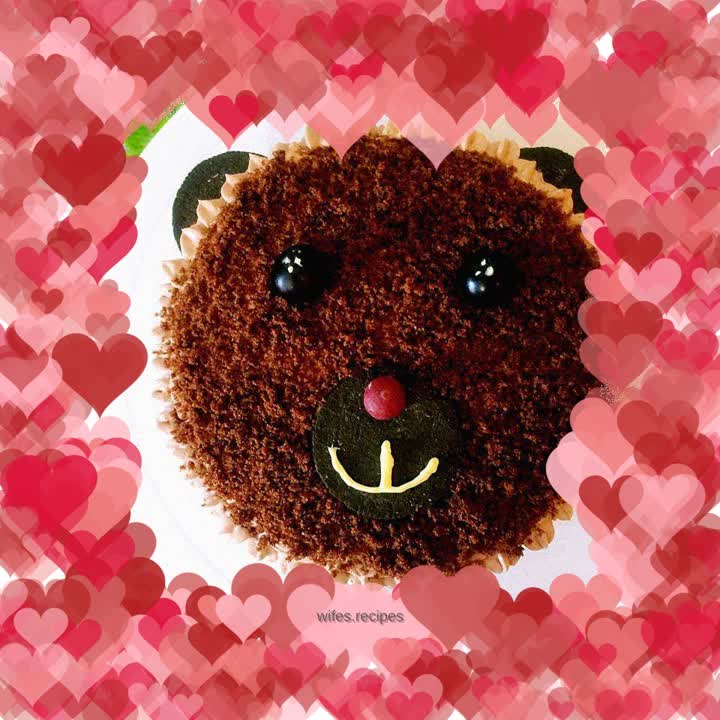
Sprinkle the cake crumbs evenly on top of the cake, stuff two left ears of Oreo biscuits on both sides (separate one biscuit into two pieces and scrape off the filling part with a knife), use another biscuit to make the mouth, two grapes to decorate the eyes, and jelly beans to decorate the nose. Use your favorite piping tip to pipe any pattern around the cake. Okay, a cute little bear is finished.

-
I made a potted cake with the extra cake crumbs and cream, so I didn’t waste any ingredients

-
Let’s take another group photo, hehe
