Love chiffon cake roll
Overview
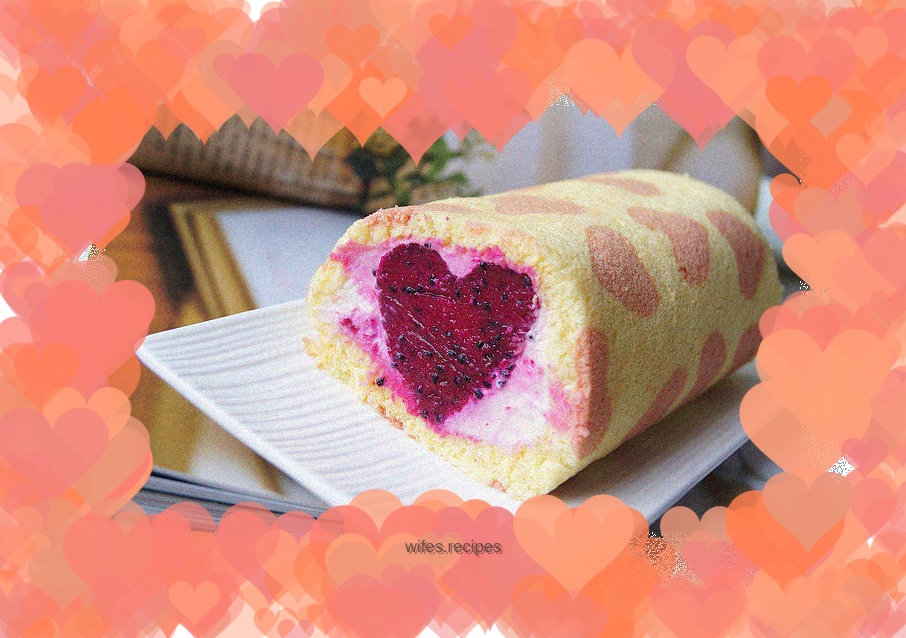
With a little coloring and a little pattern, the cake rolls will become unique. This cake roll is colored with red yeast rice powder and has a pink heart-shaped pattern, and is paired with heart-shaped red dragon fruit filling. The soft cake, rich cream and the sweetness of dragon fruit create a cloud-like taste. When it melts between your lips and teeth, you may hear the sound of flowers blooming.
Tags
Ingredients
Steps
-
Weigh the ingredients and set aside.

-
Make the filling for the sandwich first. Peel the red dragon fruit and cut it into heart-shaped pieces using a heart-shaped mold, making it as long as possible.

-
Prepare a rectangular box, cover it with plastic wrap, and place the heart-shaped dragon fruit neatly in it, with the pointed end facing up. Leave a little more plastic wrap.

-
Put the whipping cream and caster sugar in a large bowl, and use an electric mixer to beat until a stable pattern can be maintained. Refrigerated cream is easy to beat, so be careful not to overbeat.

-
Pour the whipped cream evenly into the pitaya box, wrap the pitaya, being careful not to let the pitaya move, then wrap the cream with plastic wrap and place it in the refrigerator together with the box. My box is a bit big, so I stuffed it with paper towels to help set it.

-
Place a silicone mat with a heart-shaped pattern on the baking sheet and oil paper. It is best to place the oil paper on top of the silicone mat and brush a thin layer of oil on the oil paper.

-
Use two clean, water-free and oil-free large bowls to carefully separate the egg yolks and whites. Add the sugar, oil and water to the egg yolks respectively, and mix evenly with a hand mixer.

-
Sift the low flour into the egg yolks, mix evenly with a manual egg beater, then use a spatula to remove the batter from the walls of the bowl and mix evenly. The mixed batter should be smooth and without lumps.

-
Add the sugar to the egg whites three times and beat with an electric whisk. When the whisk is lifted vertically and small hooks appear, it is in a wet foaming state and the mixture is ready. (You can preheat the oven at this time)

-
Pour one-third of the meringue into the egg yolk paste, use a spatula to quickly stir it up and down in a J shape, then pour the egg yolk paste into the remaining meringue bowl, and stir quickly evenly. Do not stir in circles to prevent defoaming.

-
Take two tablespoons of batter and put it into another bowl, add a little red yeast rice powder (just take a little bit with your thumb and index finger), use a spatula to quickly stir it up and down in a J shape. The more red yeast rice powder, the redder the color will be. You can adjust the color according to your preference.

-
Put the pink batter into a piping bag, cut a small opening, and trace a heart-shaped pattern on the oil paper. Place in the oven for 2 minutes and take out immediately.

-
Take another piping bag, put a spoonful of primary color batter, and trace another layer of outline on the heart-shaped pattern. This will make the heart pattern clearer.

-
Slowly pour the remaining batter into the baking pan from a height of about 15 cm to cover the heart-shaped pattern. Use a scraper to gently smooth the surface, then tap the bottom of the baking pan a few times with your hands to release large air bubbles.

-
Place in the middle rack of the oven and bake at 175 degrees for 20 minutes. Touch the surface of the cake with your hands. If it is not sticky and springs back well, it is ready.

-
Immediately take it out and place it upside down on a wire rack covered with new oil paper, gently tear off the oil paper on the surface, cover it with a new layer of oil paper, and let it cool.

-
When the temperature is slightly lower than the temperature of your hands, turn the cake over, take out the previously prepared cream filling from the refrigerator, and carefully move it to the middle of the cake. The placement direction of the cream filling is parallel to the left edge of the cake in the picture. (I forgot to take photos here due to my two-hand operation)

-
Fold the cake in half with the help of a rolling pin, wrap the cream filling, then wrap the cake with oil paper, wrap both sides tightly, tie with a rubber band, and refrigerate for more than 4 hours to set. Make sure to place the cake folded side down.

-
Take out slices and enjoy. You can use thin cotton thread when slicing, or you can use a bread knife. Wash the knife after each cut.

-
Finished product 1

-
Finished product 2

-
Finished product 3
