Nobita birthday cake
Overview
I watched "Doraemon Comes With Me" with my daughter on June 1. One of the protagonists in the movie is Nobita Nobita who lives in Tokyo, Japan, a boy who is not motivated in his studies, is confused every day, and is bullied by his classmates. His character not only affects his career and marriage, but also has a great impact on future generations. For this reason, Nobita's grandson's grandson Shixiu suddenly visited in a time machine with the cat-shaped robot Doraemon, hoping to completely change the fate of Nobita and the entire family. With the help of Doraemon, Nobita is no longer bullied by Fat Tiger, Xiaofu and others. He likes the beautiful girl Yuan Shizuka. In order to realize the destiny of marrying Shizuka, he and Doraemon traveled through time and space and witnessed the most critical moments and events that determine life. When Nobita gradually became happy, Doraemon had to return to the 22nd century... Although Nobita had many shortcomings, he also had his own advantages. He was kind-hearted, just, passionate, and loved nature. Therefore, children all liked this protagonist. When he came back, it happened that a good friend of his daughter had a birthday, and he asked what kind of cake he liked. I thought he would say that he likes Doraemon, but it turned out that he liked Nobita and asked for a two-layer cake. At that time, I really wanted to persuade me to make a Doraemon, but later I thought about taking a challenge and tried it. After finishing it, I was very nervous. I called my daughter and asked: Who is this? Nobita! Yay! I feel relieved that I can recognize it. Because the children asked for a double-layered one, but there were not many people eating it, I made a four-egg recipe and baked a 6-inch and a 4-inch mold on top of each other.
Tags
Ingredients
Steps
-
Separate the whites and yolks.

-
Add 30 grams of sugar to the egg yolks and mix well.

-
Add 30 grams of sugar to the egg yolks and mix well.

-
Add the milk in three batches, stirring thoroughly each time.

-
Sift in flour and cornstarch.

-
Use a spatula to mix until smooth.

-
Add a few drops of lemon juice to the egg whites.

-
Beat with an electric mixer until foamy, add 30 grams of sugar.

-
Beat until the volume increases and the bubbles are finer, then add 30 grams of sugar.

-
Beat until the surface becomes textured and add the remaining 30 grams of sugar.

-
Continue to beat until stiff foam (beat the egg beater until it forms a stiff triangle).

-
Add 1/3 of the egg whites to the egg yolk batter.

-
Use a spatula to stir up and down or cut and mix until it becomes a smooth paste.

-
Pour the egg yolk paste into the egg whites,

-
Mix well using the same stirring and cutting methods.

-
Pour into the mold, hold it up and shake it on the table a few times to make big bubbles.

-
Preheat the oven to 140 degrees, then adjust to 130 degrees after putting it in the oven. After baking for 1 hour, take it out and turn it upside down to dry.

-
Whip the light cream and powdered sugar over ice water.

-
Remove the flesh from the mango and set aside.

-
Divide the 6-inch cake into two slices.

-
After spreading a layer of whipped cream on the cake, spread the mango, spread another layer of whipped cream, and cover with another slice of cake.

-
Smooth the surface.

-
Divide the 4-inch cake into two layers, spread whipped cream and mango in the middle, and smooth the surface.

-
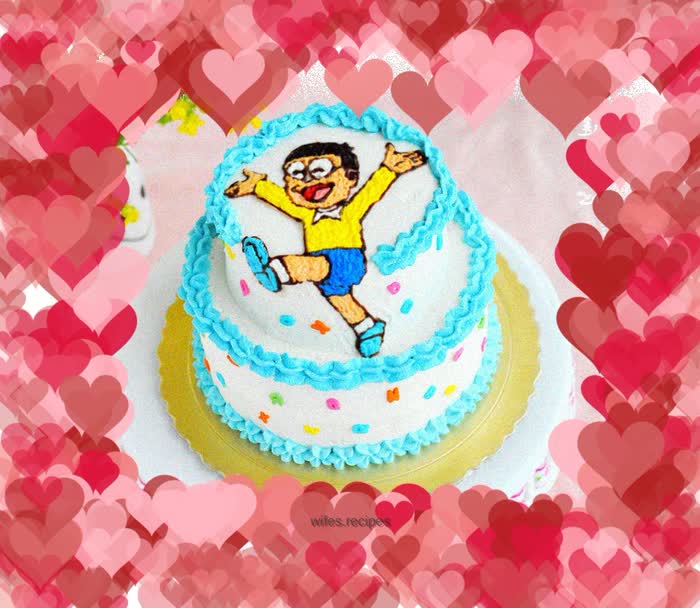
Cover a piece of white paper on the computer screen, draw Nobita with a pen, and color it (of course, it will be easiest if you have a color printer to print)

-
Place the sticky rice paper on the picture and use an edible pen to draw the outline of Nobita. Put the chocolate into a piping bag and melt it under water, cut a small opening and draw an outline on the glutinous rice paper.

-
Cut out the glutinous rice paper and carefully stick it on the cake.

-
Mix the remaining whipping cream with the corresponding coloring, put it into a piping bag, and fill it in. Finally, surround the edges and decorate with sugar slices in the blank spaces.
